Showing posts with label accessories. Show all posts

Friday, November 29, 2013

Adrin's Hangers from Hangers by Hannah


We need wooden hanger for the fiance's barong. I don't want to settle for the plain ones and have long been waiting for the perfect reason to get the ones with custom wires. Now is the perfect time to commission for those very fun looking hangers from Hangers by Hannah.


Each hanger costs Php400 and can accommodate upto 30 characters. Normal lead time for each order is 1 week from payment confirmation, but these lovelies arrived earlier than expected date. They came neatly wrapped and safeguarded to avoid any damage while in transit.


If you're also interested for these hangers, please reach the supplier through the details provided below. =)


Hangers by Hannah

Friday, October 18, 2013

Countdown: 3 months!


We’re past our 100 days countdown, and today we only have 3 months left. We've been busiest the past weeks and panic is kicking in. I've been warned, but I didn't think that things would be this craaazy! 


 Since I declared that we've been busy, let’s see how we fared against our targets 3 months back.
  • Free Prenup Shoot with Chasing Tales Photography > DONE
  • Completion of pocketfolds > DONE
  •  Layouts for invites > DONE
  • …and other stationery
  • Production of entourage attires > DONE
  • Actual detailing with Josiah’s 
  • Wedding shoes for me > to be customized by Faire La Fete
  • Wedding shoes for Adrin
  • Documents for the wedding > 50% complete (we still lack baptismal and confirmation certificates)
  • Lot hunting > DONE. We purchased a house and lot BUT major renovations are in order.
  • Band for our reception > Crossroads Acoustic

Oh no, I see a few unaccomplished items. I hope the following compensates for the items we missed.
  • Honeymoon Plans > we booked Miniloc Island Resort by El Nido Resorts
  • Marriage License Application > requirements already submitted to the city hall
  • Family Planning Seminar > DONE. Certificate received
  • Finalized and claimed our wedding rings > We just claimed it last weekend
  • House Extension and Renovation Plan > this is taking up a lot of our time and effort - we're now working on the requirements for a building permit

For the next 30 days, let's accomplish the following, shall we? 
  1. Complete wedding documents
  2. Layout for other stationery
  3. Complete Darlene’s program workbook
  4. Complete Pre-Cana Seminar and Canonical Interview
  5. Print invitations
  6. Create our missals
  7. Detailing with Josiah’s
  8. Detailing with Scenta Creations
  9. Buy wedding shoes for Adrin
  10. Complete our wedding day accessories
  11. Order Fruit Garden giveaways
  12. Finish DIY signage
  13. Book vans for transportation provision
  14. Secure a building permit
  15. Start house construction work

Whoa! What a long list?! And all due within 30 days! So much work to be done. WE.MUST.ENDURE.

Cheers!

Thursday, July 18, 2013

Countdown: 6 months!


And just like that, we’re down to six (6) months! Yes, only six freaking months left for us before we crossover to a new civil status. I’m starting to feel the pressure and the rush as our weekends gets more and more hectic. But before we move to the potentially crazier months, it’s time to do another checkpoint. =)


To-do list 6 months ago:
  •  Groom’s Attire > EA Casedo Embroidery (Rey Casedo)
  • Parents' and Entourage's Attire > Jeff House of Fashion
  • Engagement Shoot Moodboard > Done c/o Styling by Aira Franco
  • Blueprint for DIY Invitations > In Progress (pocketfolds almost complete!)
  •  Initial Food Tasting and Detailing > Done through ad-hoc food tastings and email detailing
  •  More DIY Accessories > Matches; Shoe Sticker Decals (bought from e-bay)

Wow! Everything was ticked off! But wait, there's more! Haha. Aside from those we also managed to book/complete/ the following:
  • Emcee - Darlene Tan Salazar
  • Bridal Car - AdeB Entreprises
  • Lights Supplier - LST Mobile
  • Hotel Preps - Diamond Hotel
  • Actual Engagement Shoot – Done last June
  • Boudoir Shoot – Done last March


The process of creating my gown has also started. I had my measurements taken last May and last Sunday was my 3rd fitting. Many more to come as we close the year.

So that was a packed half-year, but it certainly pales in comparison to what lies ahead. Haha. Target for the next 3 months (I’m splitting the remaining 6 months into 2 timelines) are as follows:
  1. Free Prenup Shoot with Chasing Tales Photography
  2. Completion of pocketfolds
  3. Layouts for invites and other stationery
  4. Production of entourage attires
  5. Actual detailing with Josiah’s
  6. Wedding shoes
  7. Documents for the wedding
  8. Lot hunting (yes this is included in the wedding related tasks)
  9. Band for our reception

It really is getting more and more exciting and nerve-wracking day by day. Oh well, bring it on! =)


Cheers!


Wednesday, May 15, 2013

Makeover #2: Matches


After a long hiatus from actual DIY work (posts about invites as of late were all for materials), I had the sudden urge to tinker with our matches. Together with our bible, these were winnings from a contest we joined last year. 


To start off, I peeled off the satin cover of the matches and replaced it with dark blue felt cloth.


Then I decided to paint yellow the white and silver rope of the original design. Once dry, I attached it on the matches the same way it was used in the original design. But after doing that, the look did not come off as I expected so I tore it out again. Without any pre-meditation for this DIY, I don't have any idea what design to make. Adrin suggested to just put some lace as a simple accent. Sadly the eyelets on hand are too wide as they were intended for the wrist corsages. 

It's time to bring out the trusted box of thingamajigs once more. I was scouting for anything that I can use when I saw a white mesh ribbon which used to be a part of my old blouse (I told you, I’m such a junkie. Haha). I suddenly had the inspiration to create a flower out of it and again use my leftover beads as its core.

After making two flowers, I glued them on the upper right hand side of each match and this is how they turned out.


Simple but cute. Just how I wanted them to be. Another one for the books eh? =)


Cheers!

Friday, January 18, 2013

Countdown: 12 months!


Reality check, it’s year 2013 and next is our wedding year already. Actually exactly 1 year from today, Adrin and I will walk that nave and get hitched. Weeee!


Since I consider this whole wedding preparations a project, here’s another checkpoint. First, let’s revisit my to-do list 6 months ago and see what we were able to tick-off.
  • Bridal Gown Designer > Hana Saab Tomacruz
  • Groom’s Attire
  • Blueprint for DIY Invitations
  • Hair & Make-up Artist > Val Villarin
  • Flowers Supplier > Scenta Creations
  • Engagement Shoot Moodboard
  • DIY Accessories (Wedding Cord-DONE, Prenup Accessories and Props)

Aside from the wedding cord, I was also able to finish some other DIYs  –
  • Coins for our arrhae
  • Wrist corsage for the Flower Girls
  • Rosaries for our Principal Sponsors
  • Bible makeover

And book several more suppliers:
  • Prenup Venue: Jardin de Miramar (c/o W@W auction)
  • Roving Photographer: Studio on Wheels (c/o W@W auction)
  • Wedding Rings: Goldenhills Jewelry
  • Auxiliary Photographer: Manny and April Photography
  • Mobile Bar: GQ Mobile Bar


So, what can you say? Though we missed almost half of the planned list, it was replaced by quite a few other items, and more importantly, some of them are DIYs. Hooray! We're successful in injecting selected personalized elements into our wedding! And we plan to do MORE! Whew, another fruitful phase of our wedding planning. :)

For the next 6 months, this is our to-do list:
  1. Groom’s Attire
  2. Parents' and Entourage's Attire
  3. DIY Invitations and Stationery
  4. Engagement Shoot Moodboard
  5. Actual Engagement Shoot
  6. Initial Food Tasting and Detailing
  7. More DIY Accessories

May we have the time and energy to accomplish them all. 'Til the next checkpoint!

Cheers!


Saturday, December 08, 2012

Makeover #1: Wedding Bible


Last week, after office, I decided to grab some stuff for another DIY (okay, pseudo-DIY). I got these poster paints and brushes with the plan to put some color to our elegant-but-out-of-theme free bible.

My materials: Prussian Blue and Chrome Yellow


I covered the other sections with paper so they won’t be filled with paint, and just left the band, ribbon, and floret exposed.


Here’s the before and after look of our bible. So what do you think? Not bad for a makeover right?

Before and After


I even think that the after look is better. Oh yes, I’m so biased. Haha.

The final look of our bible


Watchout for more DIYs and pseudo-DIYs. :)


Cheers!


Saturday, November 24, 2012

Prizes from The Wedding Library

Remember the unique story contest which we joined and won as 3rd runner up? Of course you do. As a 3rd runner up, Adrin and I are entitled to Php1,000.00 worth of products from the The Wedding Library, the contest sponsor.

That was soooo two months ago but it was only earlier today when we had the opportunity to visit their store at SM Megamall as we also went to the Before I Do bridal fair.  And so, before going to the fair, we dropped by The Wedding Library to pick out our prize.

Our loot bag


We decided on these two things -- bible and matches. Why? Because these are the items needed in the ceremony which are not yet included in the accessories I’ll get together with my gown.

Winnings

This bible looks really nice. However it doesn't fit to our theme or color motif.

Bible

 Neither do these matches.

Matches

Since I'm the OC type, I prefer for our accessories to have a distinct coordinated look. Now, how do I give these two items a makeover? I shall work that out. :)


Cheers!

Sunday, October 07, 2012

DIY In Progress: Bride & Groom Signages

I'm sure you'd be shock that this early into our wedding preps, I'm already working on the signages that we'll hang outside our wedding preps hotel door. But hey, nothing wrong with it right? Who knows how heavy my work demand will be as we near the big day. That's why I want to tick off as much DIYs as I can while I still have the time.

When Adrin and I saw the stuffed felt letters in a store called EGG (Exciting Gifts and Goodies), I was instantly inspired to DIY the same letters and have them as our signages.

Something like this [Source: Etsy]

To be able to proceed with this DIY, I immediately sourced for the materials. Looking for felt cloth in the metro was quite a challenge. Nonetheless, I was able to find the right color in the small sewing/craft store at the 3rd floor of SM Makati.

As I start this project, I printed out block letters (Font used: Showcard Gothic) in a bond paper, cut them out, and used them as patterns. I carefully traced 2 pieces for each letter onto the felt cloth. I need two since I’ll be sewing them together and put some stuffing inside, just like how the letters are in the above photo.


I’ve completed cutting all the tracings out and now they are ready for stitching. It will be a tedious and time consuming task so I need to schedule this in one of the upcoming holidays. Of course I’ll update you as soon as I complete them, so watch out for it. :)


Cheers!


Monday, August 27, 2012

DIY #2: Ruffly Wrist Corsage

Making the most out of my work hiatus, I was able to tick off another item on the list. I bought the materials from Carolina's a few days ago, when I had my long overdue "me time". This wrist corsage made it to our DIY list after we decided with our theme. And one time that I was looking for inspirations, I came across the picture below. It was so cute and lovely! I just knew that our flower girls should have something like this.

Ruffly Corsage | Martha Stewart Weddings

So when I had the free time to scour for some eyelet trimmings, there's no way I'd let that opportunity pass. I first checked fabric shops in Glorietta 4, but not even a single shop sells what I was looking for. Luckily, the  lady in the last shop I went to was kind enough to refer me to Carolina’s at Glorietta 5. I treaded my way to the other building, looked for the said shop, and lo and behold, they have it! Apparently Carolina’s is a lace shop, so they have a wide array of lace and eyelet trimmings in different colors, sizes, and designs. I carefully scrutinized the items on display and bought 3 different types since I am not sure which among them will best look as a  flower.

I used the leftmost eyelet

Itching to finish this one, I started working as soon as I got home. Each trimming was used for a trial flower, and then I asked my family to pick which one looks best. The eyelet in nude won by a landslide, because it better complements our complexion compared the ones in stark white.  I was in production mode after that as  I so wanted to complete the corsages immediately. Excited much? Hihi.

Anyway, after crafting the 3 cute flowers, which I adorned with a yellow bead at the center, I was stuck because I did not buy any thin trimmings that will serve as wrist straps. Not wanting to give up and just continue on another day, I turned again to my trusty box of thingamajigs and found some cream satin ribbons. And they are just enough (as in no excess, not even a centimetre) to be placed as straps to my corsages. They’ve been in that box for ages (I think since my HS graduation! What a junkie?! Haha.), and finally I’ll be able to put them into good use. =P

I sew those ribbons at the back of the eyelet flowers, covered the stitches with some felt cloth for a clean finish, and voila, I now have 3 dainty and ruffly wrist corsages for our little girls. :)

Our Ruffly Corsages

Modeled by my young cousin :)


Carolina's Lace Shoppe


Cheers!


Thursday, July 05, 2012

First Take on Fabric Flowers


I do not consider myself a creative person, nor do I have any penchant for the arts. I actually avoid it as much as I can, thinking that I’m not good at it. But during those times that I’m forced to work on artsy things, I tend to get engrossed on it and always find myself enjoying the activity. Despite my lack of creativity, I know that I love working with my hands. I even engaged myself in crafts (cross-stitching, scrapbooking, refashioning my clothes, decorating notebooks, etc.) when I was younger. Sadly I explored other activities, and coupled with the demands of work, my fascination with crafts was ultimately pushed aside.

Working on our wedding preps gives me a new opportunity to use my hands and come up with something. As early as day 1, I’m already positive that we won’t get through this whole wedding thing without a single DIY output.

Now that we’ve booked our major suppliers, we can already focus on our target DIY’s. I’ve yet to finalize the list and do the prioritization though.  By August, I hope we’ll already be in full swing ticking the first item in the list.

Given some free time today, I decided to try out some fabric flowers. We have several ideas in mind as to how and where we’ll use them, but I’m not sharing yet. Just hang in there for now; I’ll let you into it once we’ve started the actual work. *wink*

And so, after a long intro, I share to you the fabric flowers I was able to come up with today. This was not pre-meditated so pardon the materials used. I just scouted for scraps of fabric or wrapping materials that I’ve lovingly kept before. Yes, I’m such a junkie. I keep those in a box together with other thingamajigs with the intention to put them into good use someday. =P

This is my first output. The tutorial I found on the internet was easy to follow and this thing was easy to create. I'll probably try a different material next time.
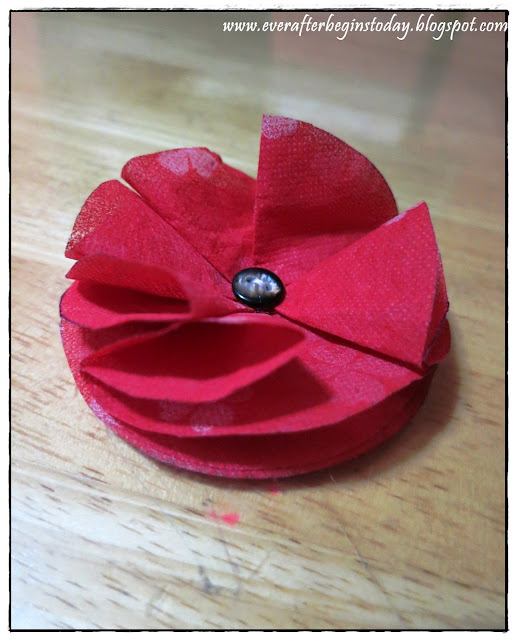
Flower #1


Next I created this following this tutorial. Out of my 3 outputs for the day, this is the easiest to create. You can actually finish one in around 10mins. However it looks kinda plain and flat (lacks dimension) since my fabric was too short to create two layers of "petals".

Flower #2


My last output is this. After creating the first one, I looked for other versions where I can also use the extra circle cutouts. Found this tutorial, so I decided to try it out as well. Of the three, I spent the most time on this design because you need several petals and  it has to be sewn in one by one. It's puffy and has volume but looks a bit stiff. I'm sure it'll turn out better using a real fabric.

Flower #3


They look oh so pretty, don't they? =)


Cheers!